Introduction
-
設計手機APP,需要使用JAVA程式語言,IDE使用Android Studio,最好還有一支手機(+usb連接線)。
- 首先下載安裝Java JDK。
- 接著下載安裝Android Studio。
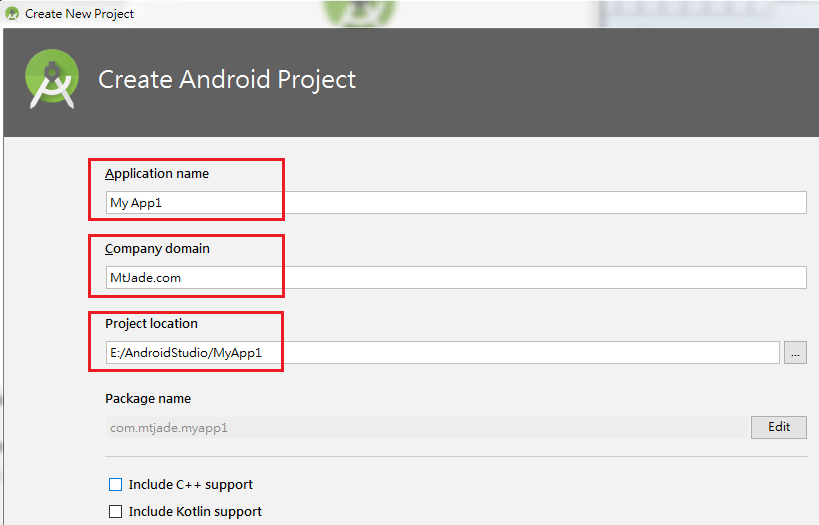
- 安裝完成後,打開Android Studio,選擇Start a new Android Studio project,應該會出現以下畫面。輸入Application name(自訂),Company domain(自訂),然後選擇一個路徑(Project location)作為project的儲存位置,Package name會自己產生。
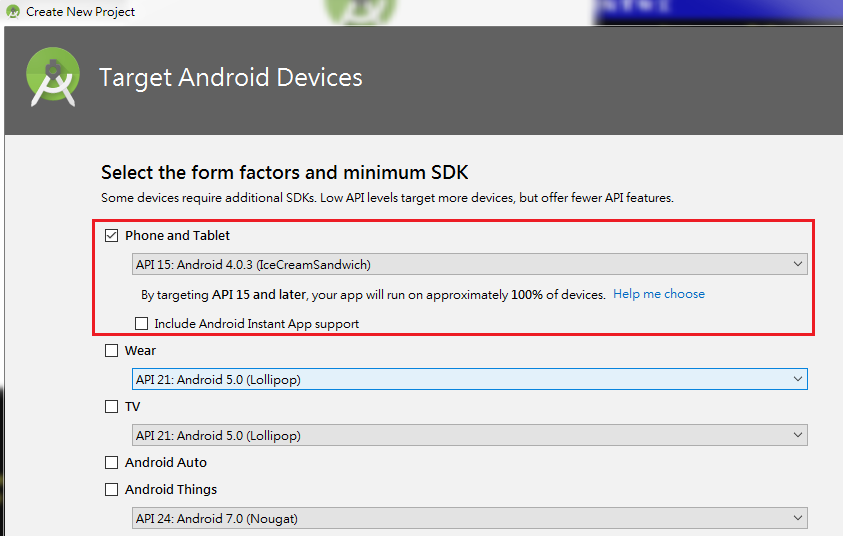
- 按下Next之後,出現以下畫面。因為要設計手機程式,所以選擇第一個選項(Phone and Tablet)。中間可以選擇設計的手機型號,其中的100%表示在這個型號上設計大概市面上100%的手機都適用。你可以選擇其他型號,一般最好選適用度越高的。
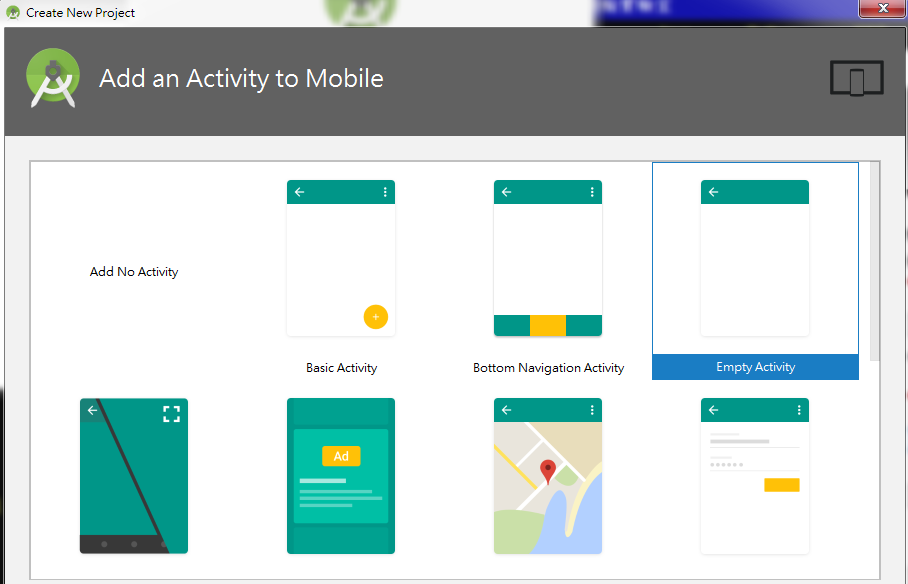
- 按下Next之後,出現選擇Activity的畫面。選擇Empty Activiey。
- 按下Next之後,最後出現Configure Activity畫面,按Finish完成。

- 經過一番時間的建立後,會進入程式設計的畫面如下。activity_main.xml與MainActivity.java這兩個tab即為之後要設計的位置。點選activity_main.xml,會看到一個手機畫面,中間顯示Hello World,這已經是一個可執行的程式。

- 若要執行程式,可選擇使用模擬器(emulator)或實機。先介紹使用模擬器的方法,之後再介紹使用實機的方法。emulator的做法是先點選上方的AVD Manager,
 會出現以下畫面。
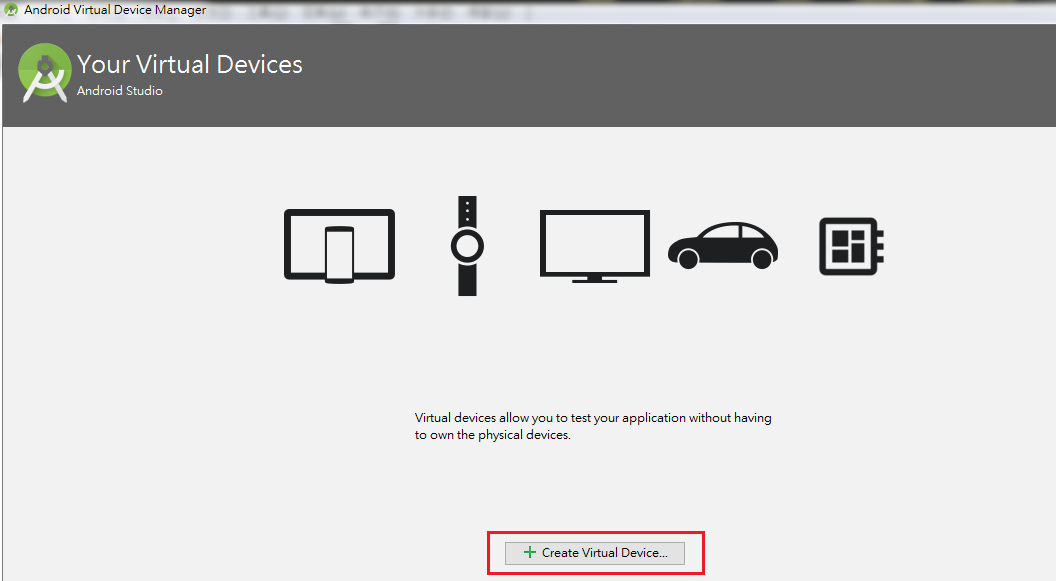
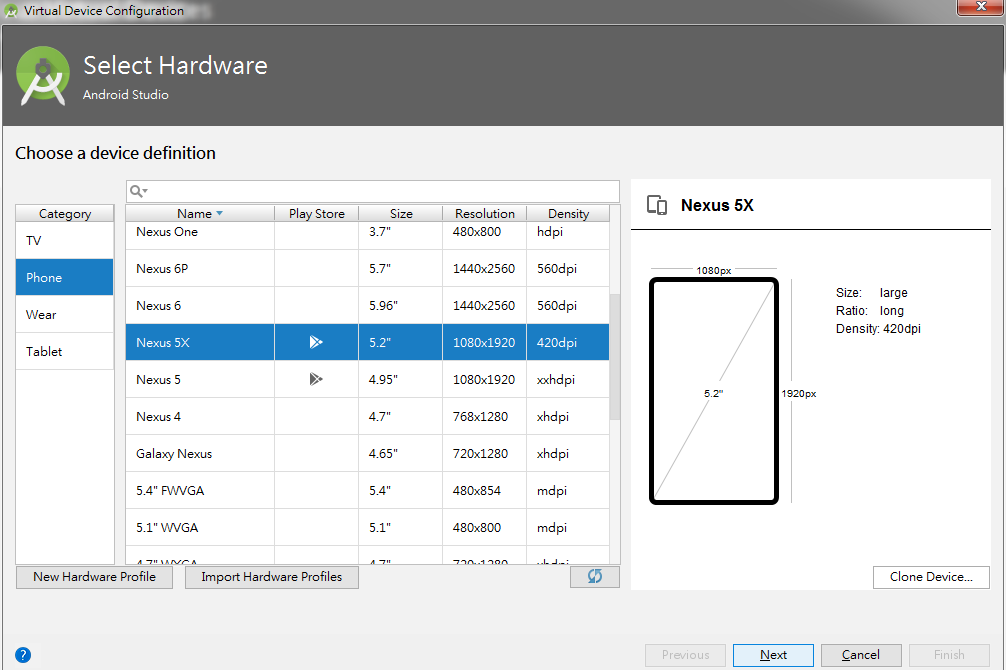
- 點擊Create Virtual Device...後,出現以下畫面來選擇要模擬哪一類型手機,你可以選擇型號,不要選擇太新的型號,免得城市的適用性降低,在此選擇預設手機型號。
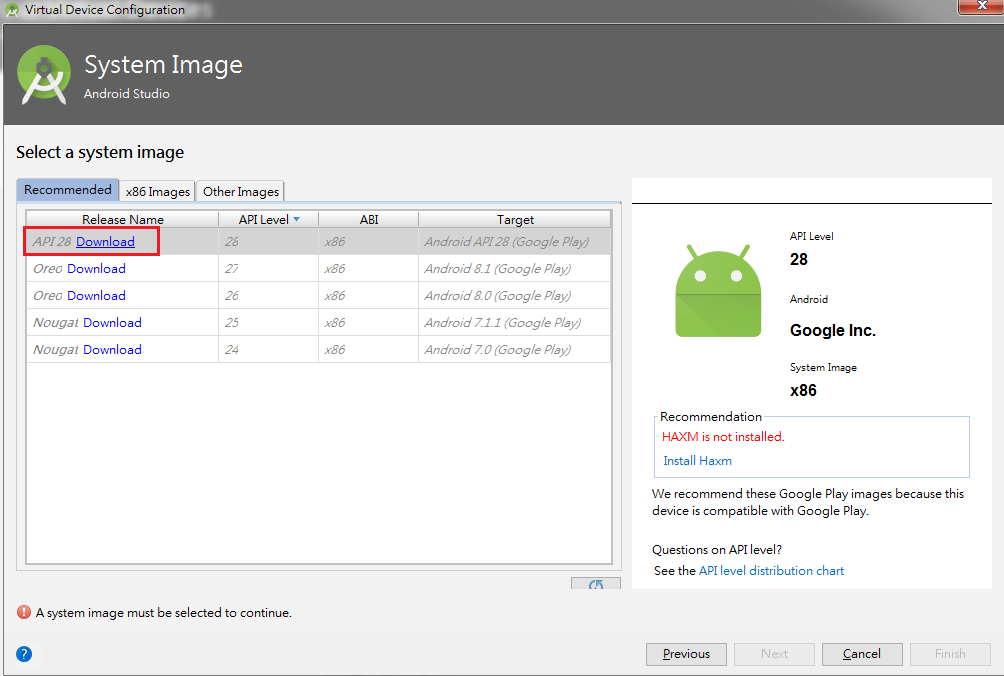
- 點擊Next後,出現選擇icon的畫面,應該可以任選,在此使用第一個,點擊Download。
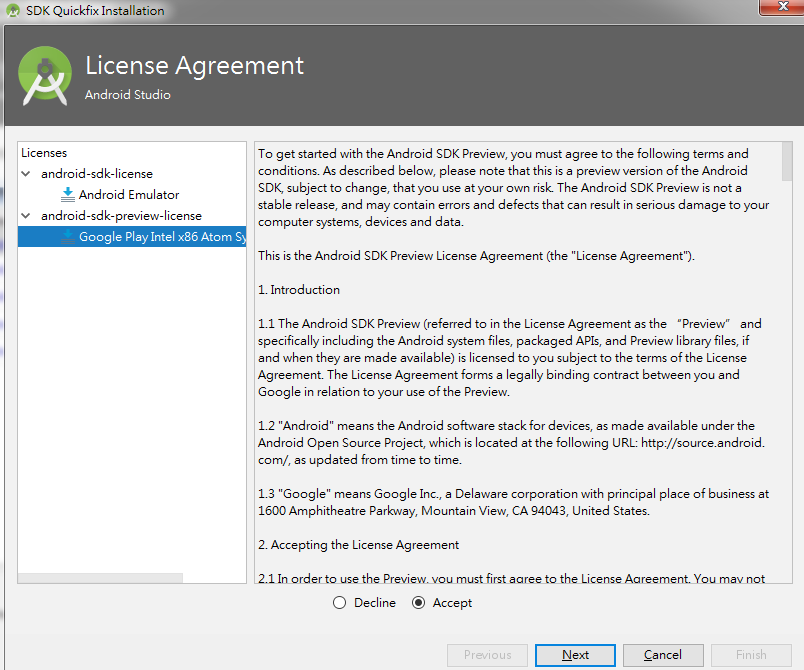
- 接著出現License Agreement畫面,將左邊各項點開選擇Agree。
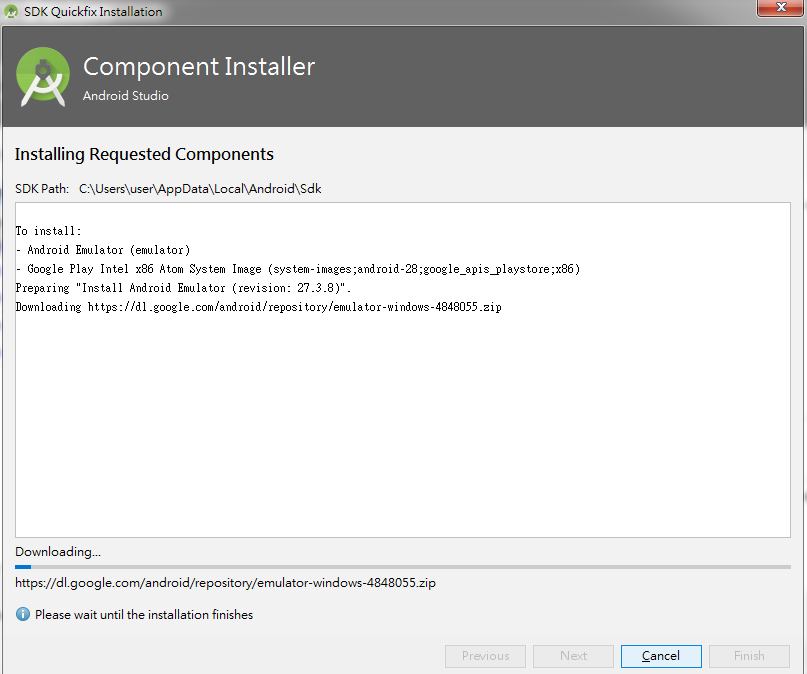
- 出現Component Installer畫面,靜靜地等它下載完成。
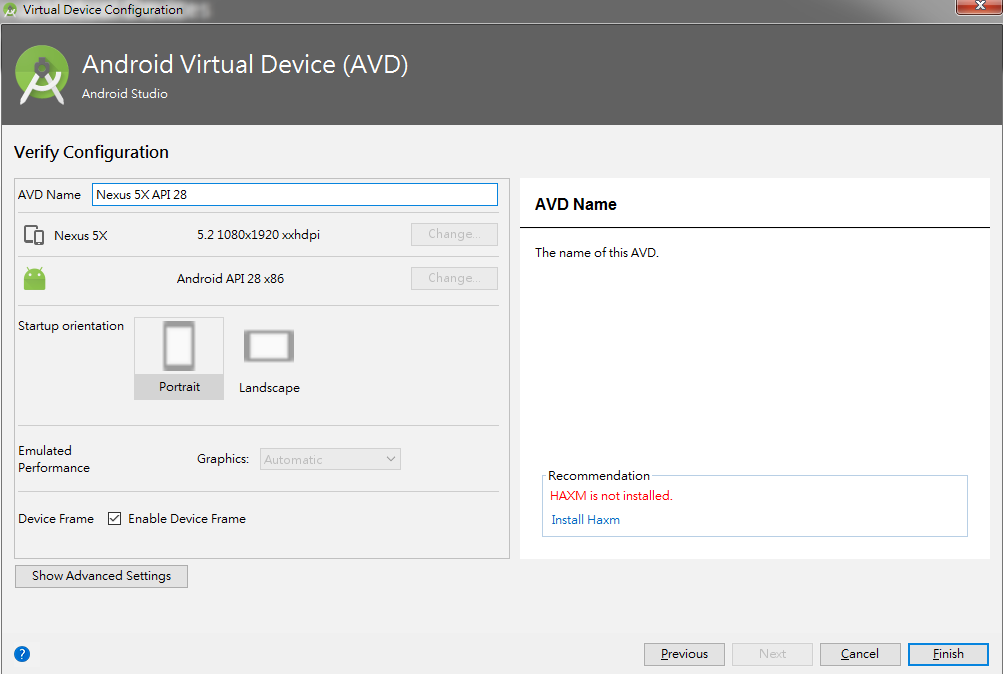
- 下載完成後按Finish,然後按Next,進入完成畫面,選擇安裝HAXM(右邊的Recommendation),可以加速模擬器,之後按Finish完成(有時候沒安裝好像無法使用模擬器,所以雖說是建議,但是要安裝)。
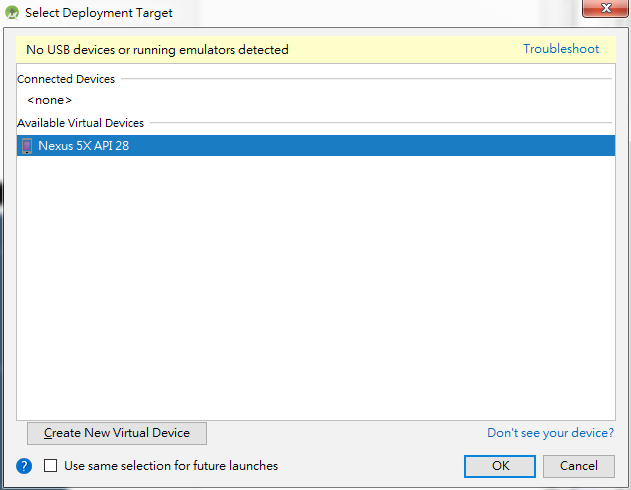
- 接下來回到Android Studio設計畫面,點擊上方的綠色三角形(Run),會出現以下畫面,可以看到適才建立的模擬器。
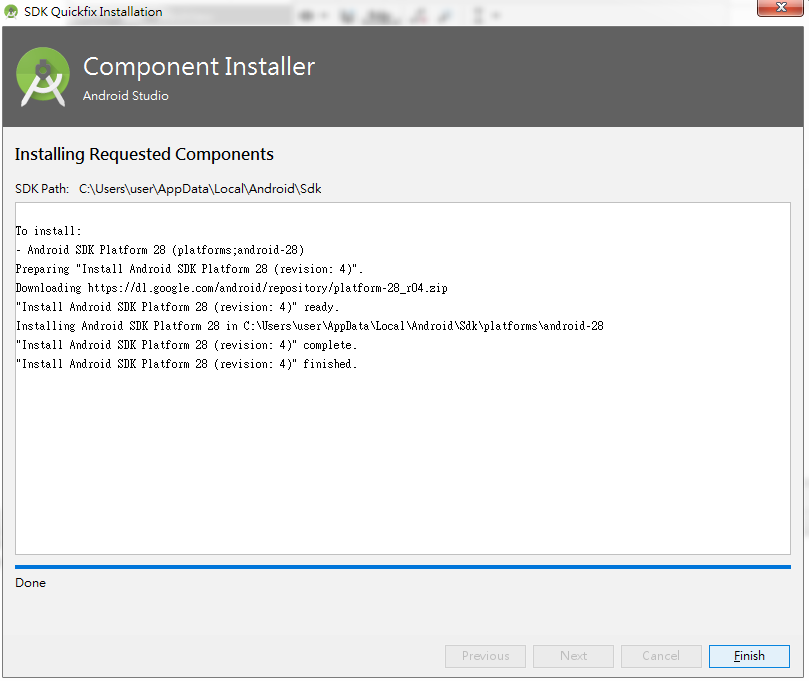
- 點選OK後,出現如下畫面。選擇Install and Continue。

- 再度經過一番的下載與安裝,完成後按Finish。
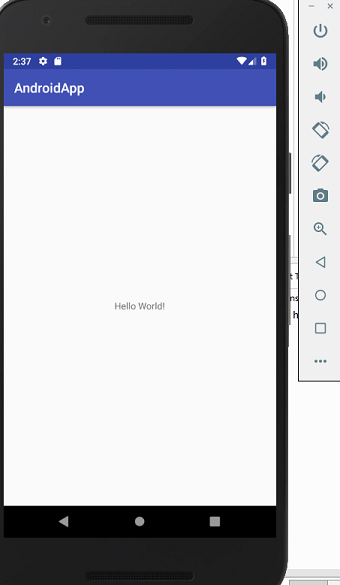
- 點擊執行後可以得到模擬手機執行畫面。
選擇在emulator上執行程式,速度慢,時間長,等到花兒都謝了,所以一般還可以再利用一些加速器來加速,例如使用Genymotion。
- 使用實機來執行程式可以快速一點,先將手機接上電腦,打開開發人員選項(請注意不同手機的開啟方式不同,請自行上手機的官網查詢。例如這裡使用ASUS手機,方式是選擇手機的設定>關於>軟體資訊,在版本號碼上點擊七次),回到設定找到開發人員選項進入後點選USB偵錯。接下來回到Android Studio點擊上方的綠色三角形(Run),點下去出現以下畫面。
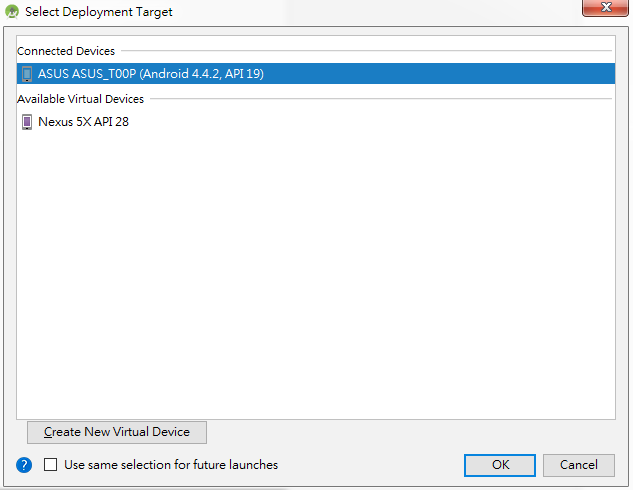
按下OK後,應該可以在手機上看到顯示Hello World的程式。在手機的應用程式內也可找到MyApp1這個程式。
因為版本問題,重新安裝了三次才能正常使用,使用的build.gradle(Module:app)中的dependencies如下。
build.gradle(Module:app) -- (compileSdkVersion 26;targetSdkVersion 26;)
build.gradle(Module:app) -- (compileSdkVersion 26;targetSdkVersion 26;)
dependencies {
	implementation fileTree(dir: 'libs', include: ['*.jar'])
	implementation 'com.android.support:appcompat-v7:26.1.0'
	implementation 'com.android.support.constraint:constraint-layout:1.1.2'
	testImplementation 'junit:junit:4.12'
	androidTestImplementation 'com.android.support.test:runner:1.0.2'
	androidTestImplementation 'com.android.support.test.espresso:espresso-core:3.0.2'
}
需要先施作File > Sync Project with Gradle Files才能使用。
Widget
手機程式類似視窗程式設計,widget為其中的元件,例如之前顯示Hello World的元件即為一個元件(TextView)。在activity_mail.xml下,顯示手機的左手邊有兩個小視窗,上方為Palette,下方為Component Tree,Palette內含可以使用的widget,如下圖: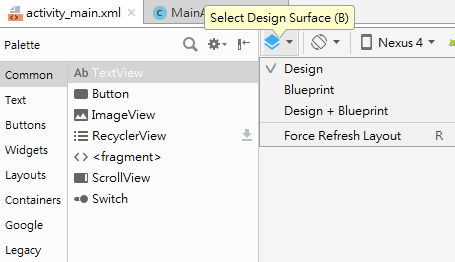
- 順帶一提,使用旁邊的Select Design Surface(B)來選擇顯示手機的Design畫面,還是Blueprint畫面,還是兩者皆顯示。

- 在此顯示程式畫面的布置(Layout),而其中包含一個名為hello(你顯示的不是hello,應該是內定值,下面會介紹如何命名)的Widget(TextView),其內有一內容為Hello World!的字串。
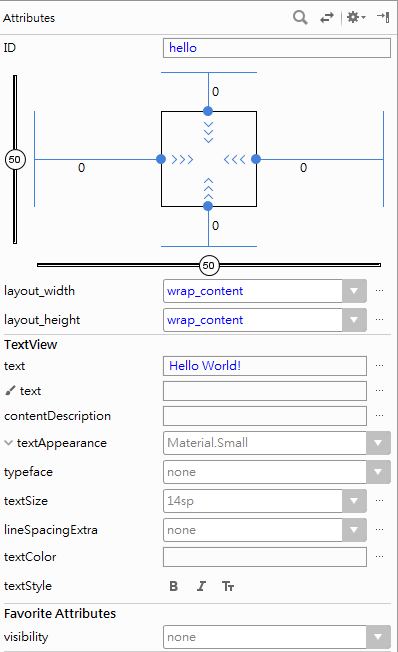
- 此處的資訊即為該TextView的資訊(fewer attributes),在上方放大鏡圖樣的右邊有一個左右箭頭的圖像(View all attributes),點擊可切換至顯示所有資訊內容的畫面,再點擊一次又會換回來。也可以在此視窗的最下方找到View all attributes(或View fewer attributes)來切換。
- 在最上方可以看到ID,修改ID名稱,按Enter,可以看到Component Tree內的元件ID跟著改變。
- 在ID左邊與下方各有一個bar,中間有個圓形其中有數字,數字為50表示元件介於視窗中間,你可以使用左鍵按著圓圈移動來試著調整元件位置。。
- 中間的四方框代表元件,四面各有一個數字(初始應為0),此數字代表邊界。例如將上方數字改為32,表示元件與上方邊界的距離至少32。其他方向類似。
- 你可以在中間的手機畫面上直接拖曳元件來調整位置。
- 在下方的layout_width與layout_height可以控制元件的大小,預設值為wrap_content,表示元件的大小與內容相當(e.g. 隨著文字內容大小改變)。若將內容改為match_parent,表示會符合parent的大小,例如將layout_width改為match_parent,那麼TextView的寬度等於視窗的寬度。
- 再往下則為TextView的內容,第一個Text是為內含文字字串,你可以在此直接修改顯示內容。
- 下方的幾個選項可以修改字型,字體,大小,顏色等等。
Button
接下來介紹Button元件。在Palette上點Button(common > Button or Buttons > Button),拖曳到手機任意位置上,在Attributes的四方框四面的+號上點開邊界。修改ID(btnGreeting)與顯示文字(GREETING),將按鈕調整到你想要的位置並修改其屬性(文字大小背景顏色等)。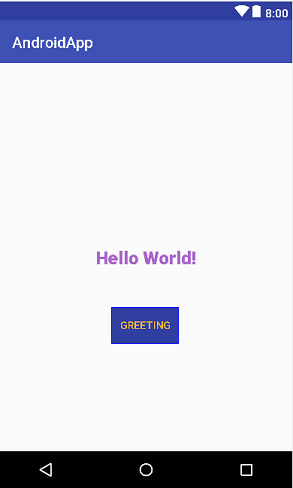
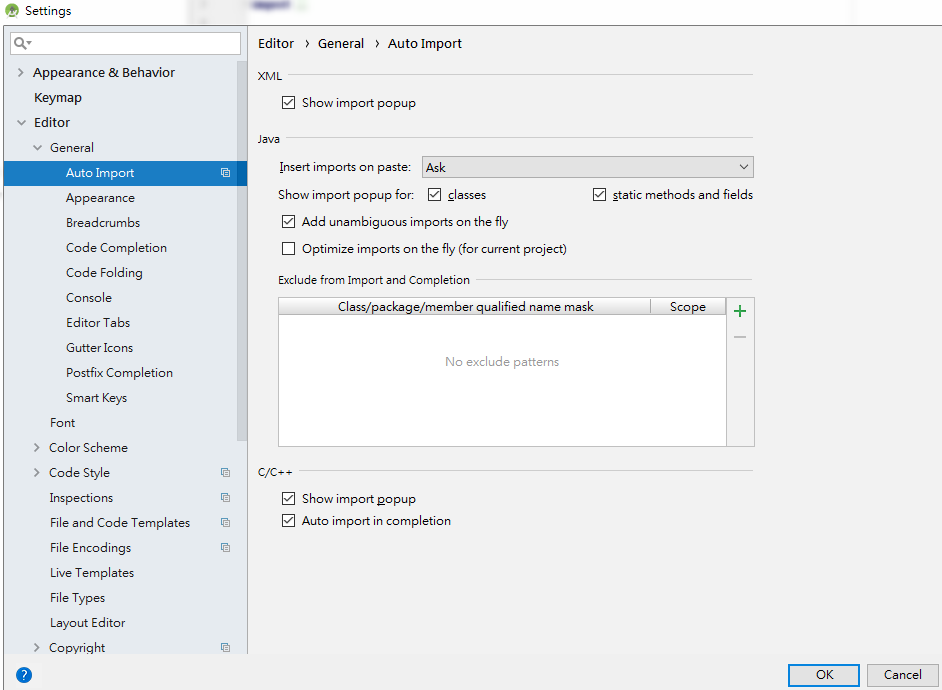
設計好了外觀,接下來切換到MainActivity.java,我們需要在此設計按鈕被按下後產生甚麼效果。因為設計程式時會需要import相關package,要記住所有package的名稱太麻煩,所以先設定自動import。做法是選擇File>Settings...,在跳出來的視窗中找到Editor>General>Auto Import,並將各選項設定如以下畫面。
AppApplication1
package com.mtjade.appapplication1;

import android.support.v7.app.AppCompatActivity;
import android.os.Bundle;
import android.view.View;
import android.widget.Button;
import android.widget.TextView;

public class MainActivity extends AppCompatActivity {

	private Button btnGreeting; // declare Button
	private TextView tvHello; // declare TextView

	@Override
	protected void onCreate(Bundle savedInstanceState) {
		super.onCreate(savedInstanceState);
		setContentView(R.layout.activity_main);

		btnGreeting = (Button) findViewById(R.id.btnGreeting); // cast view to a button
		tvHello = (TextView) findViewById(R.id.hello); // cast view to a textview

		btnGreeting.setOnClickListener(new View.OnClickListener() { // event listener
			@Override
			public void onClick(View view) {
				tvHello.setText("What's up!");
			}
		});// end of event listener

	}
}
- 在原來的程式內加上有註解的程式碼,import的部分會自動加入
- 宣告btnGreeting與tvHello兩個元件 。
- 在onCreate(表示建立之時)之內取得兩個元件,並將其cast成所需的形式(e.g. 使用(Button)用來將取得的物件cast成為Button)。findViewById()函數用以根據Id取得View物件。R表示Resource,R.id.hello整個意思是resource內id名為hello的view物件。
- setOnClickListener()方法用來設定Button的按下事件,參數為View.OnClickListener物件,其為一interface,需實現onClick(view)方法。setText()方法可以設定元件的顯示字串。也就是說按下Button後,TextView的文字會由Hello World!變成What's up!,執行一次看看結果。
Text > Plain Text
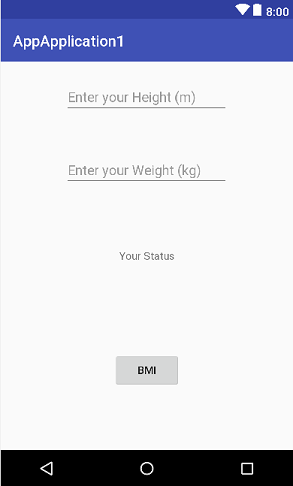
當要設計一個需要輸入數值的程式,例如計算BMI,我們需要可以接受使用者輸入的元件,選擇使用Text > Plain Text。在Palette選擇Text > Plain Text,置於適當的位置。設計計算BMI的程式需要輸入身高與體重,所以需要兩個Plain Text。而顯示計算後的結果需要一個TextView(common > TextView or Text > TextView),此外,尚需要一個Button來觸發計算。所以可以配置如下圖。
- 作為練習使用,可以重開專案或是修改上一個例子。
- 將第一個Plain Text的ID設為txtHeight,清空顯示文字,並點開其邊界。
- 將第二個Plain Text的ID設為txtWeight,清空顯示文字,並點開其邊界。
- 將TextView的ID設為tvBMI,顯示文字設為Your Status,並點開其邊界。
- 將Button的ID設為btnBMI,顯示文字設為BMI,並點開其邊界。
- 通常我們應該在每一個Plain Text的旁邊再加上一個TextView,提示此處應該要輸入甚麼資訊,在此我們採用Hint方式。點擊txtHeight,在attributes視窗點View all attributes,在列表中找到Hint,輸入Enter your Height(m)。同樣點擊txtWeight,在attributes視窗點View all attributes,在列表中找到Hint,輸入Enter your Weight(kg)。你可以在元件上看到這些文字。
- 切換到MainActivity.java撰寫程式。
AppApplication1
package com.mtjade.appapplication1;

import android.support.v7.app.AppCompatActivity;
import android.os.Bundle;
import android.view.View;
import android.widget.Button;
import android.widget.EditText;
import android.widget.TextView;

public class MainActivity extends AppCompatActivity {

	private Button btnBMI;
	private TextView tvBMI;
	private EditText txtHeight;
	private EditText txtWeight;

	@Override
	protected void onCreate(Bundle savedInstanceState) {
		super.onCreate(savedInstanceState);
		setContentView(R.layout.activity_main);

		btnBMI = (Button) findViewById(R.id.btnBMI);
		tvBMI = (TextView) findViewById(R.id.tvBMI);
		txtHeight = (EditText) findViewById(R.id.txtHeight);
		txtWeight = (EditText) findViewById(R.id.txtWeight);

		btnBMI.setOnClickListener(new View.OnClickListener() {
			@Override
			public void onClick(View view) {
				double h = Double.parseDouble(txtHeight.getText().toString().trim());
				double w = Double.parseDouble(txtWeight.getText().toString().trim());
				double bmi = w/h/h;

				if(bmi < 18.5)
					tvBMI.setText("BMI = "+bmi+"\n太輕了,要多吃一點");
				else if(bmi>=18.5 && bmi<23.9)
					tvBMI.setText("BMI = "+bmi+"\n標準身材,請好好保持");
				else if(bmi>=23.9 && bmi<27.9)
					tvBMI.setText("BMI = "+bmi+"\n喔喔!得控制一下飲食了,請加油!");
				else
					tvBMI.setText("BMI = "+bmi+"\n肥胖容易引起疾病,得要多多注意自己的健康囉!");
			}
		});
	}
}
- 與之前相同,利用findViewById()方法取得元件,在此的元件變數名稱不一定要與其ID相同,不過可以相同,且不易搞錯。
- 使用getText()方法取得輸入的資料,需再使用toString()來讓其傳回字串。
- 因為要取得的身高體重資料都是數字(包含小數),在選擇EditText時,可以選擇Text > Number(Decimal),如此在使用時,會限定只能輸入數字,換了元件但程式碼不需要改變。
- EditText還有其他選擇,例如專供輸入密碼或是電話email等。
Activities
- Activity指一個頁面,一個程式可能包括好幾個頁面(Activities),要由一個頁面跳到另一個頁面,可以使用startActivity(intent)方法。
- 首先建立一個新的Project,在activity_main.xml的手機中建立一個id為btnNext的Button,顯示文字為Next。
- 因為關連到第二個Activity,在左邊找到app > java > com.... > MainActivity,在com...或MainActivity上點右鍵,選擇New > Activity > Empty Activity。
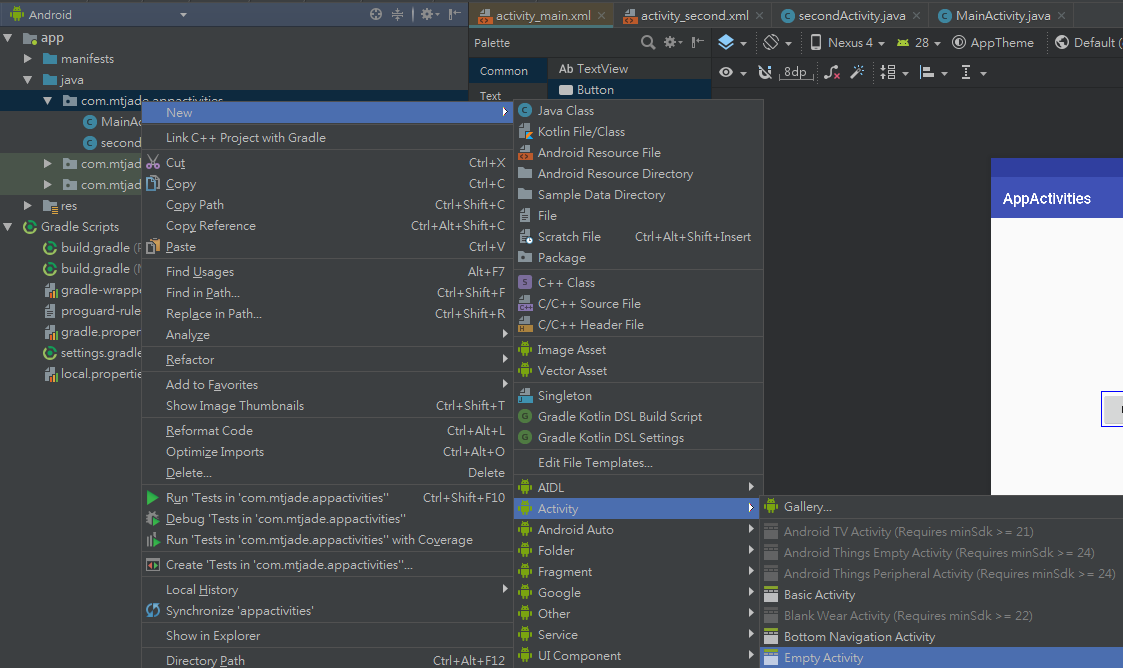
點下後出現新的activity命名畫面,命名為secondActivity。
- 此時有兩個activity,先在activity_second.xml的手機中加上一個TextView,顯示其為不同的頁面。
- 在MainActivity.java內加上如下的Code。
AppActivities > MainActivity.java
package com.mtjade.appactivities;

import android.content.Intent;
import android.support.v7.app.AppCompatActivity;
import android.os.Bundle;
import android.view.View;
import android.widget.Button;

public class MainActivity extends AppCompatActivity {

	@Override
	protected void onCreate(Bundle savedInstanceState) {
		super.onCreate(savedInstanceState);
		setContentView(R.layout.activity_main);
		// Button Next
		Button btnNext = (Button) findViewById(R.id.btnNext);
		btnNext.setOnClickListener(new View.OnClickListener() {
			@Override
			public void onClick(View view) {
				Intent intent = new Intent(getApplicationContext(), secondActivity.class);
				startActivity(intent);
			}
		});
	}
}
- 與之前類似,針對btnNent建立觸發事件(setOnClickListener)。
- startActivity()的參數為Intent
- Intent的定義為An intent is an abstract description of an operation to be performed. It can be used with startActivity to launch an Activity.,設施要試著去實現Intent要求的行為。
- 根據此建構子
Intent(Context packageContext, Class<?> cls) => Create an intent for a specific component.
new一個名為intent的Intent物件。 - Context使用getApplicationContext()方法得到(或使用MainActivity.this)。
- 第二個參數則為第二個Activity(secondActivity.class)。
- 執行程式後,按下按鈕便會跳到另一個頁面。
Intent
除了可以轉換到另一個Activity,還可以在轉換過程中傳遞資訊。首先先修改在MainActivity.java內的onClick()方法如下。MainActivity.java
public void onClick(View view) {
	Intent intent = new Intent(getApplicationContext(), secondActivity.class);
	intent.putExtra("MtJade.com", "Hi, there.");
	startActivity(intent);
}
- 原則上就是多加了一行,使用intent.putExtra()方法,將額外的資訊傳出(Add extended data to the intent.)。
- putExtra(String name, String value),第一個參數就是個名字,第二個參數是要傳遞的資訊。
接下來修改secondActivity.java
package com.mtjade.appactivities;

import android.support.v7.app.AppCompatActivity;
import android.os.Bundle;
import android.widget.TextView;

public class secondActivity extends AppCompatActivity {

	@Override
	protected void onCreate(Bundle savedInstanceState) {
		super.onCreate(savedInstanceState);
		setContentView(R.layout.activity_second);

		if(getIntent().hasExtra("MtJade.com")){
			TextView tv = (TextView) findViewById(R.id.textView);
			String s = getIntent().getExtras().getString("MtJade.com");
			tv.setText(s);
		}
	}
}
- 使用getIntent().hasExtra()方法來判斷是否有額外資訊,hasExtra()的參數就是適才定義的名字。
- 使用getIntent().getExtras().getString("MtJade.com")方法取得要傳遞的訊息字串,再將其設為TextView要顯示的字串(或直接使用getStringExtra("MtJade.com")替代getExtras().getString("MtJade.com"))。
- 使用Bundle來傳遞多項訊息(類似傳遞物件),使用getBundleExtra("bundleName")來取得Bundle。
- 執行程式可以看到第二頁顯示傳遞的內容。
Activities outside App
除了可以轉換到APP的另一頁,還可以到其他網頁,首先先在activity_main.xml再加上一個按鈕,假定按下按鈕要轉換到Google,所以按鈕文字設為Google,ID便設為btnGoogle。接下來在MainActivity.java加上以下的程式碼。
MainActivity.java
// Button Google
Button btnGoogle = (Button) findViewById(R.id.btnGoogle);
btnGoogle.setOnClickListener(new View.OnClickListener() {
	@Override
	public void onClick(View view) {
		String gg = "http://www.google.com";
		Uri uriGg = Uri.parse(gg);

		Intent intentGg = new Intent(Intent.ACTION_VIEW, uriGg);
		if(intentGg.resolveActivity(getPackageManager()) != null){
			startActivity(intentGg);
		}
	}
});
- 使用這個Constructor來建構Intent。Intent(String action, Uri uri) => Create an intent with a given action and for a given data url.
- 使用Intent.ACTION_VIEW來得到actiona,並使用Uri.parse()來得到Uri。
- 先判斷intentGg.resolveActivity(getPackageManager())是否為空,若不是再使用startActivity()方法來轉換頁面。
- 執行程式後按下按鈕會轉換到Google頁面。
Containers -- ListView
ListView似乎在新版將被淘汰,不過還是值得玩一下,找到Palette > legacy > ListView,拖曳至手機畫面。在左邊檔案目錄中找到Android > app > res > values > strings.xml,在其中加入以下內容。strings.xml
<resources>
	<string name="app_name">AppListView</string>

	<string-array name="cars">
		<item>Mercedes</item>
		<item>Porsche</item>
		<item>Maserati</item>
	</string-array>

	<string-array name="prices">
		<item>6520000</item>
		<item>6080000</item>
		<item>3990000</item>
	</string-array>

	<string-array name="descriptions">
		<item>Mercedes-AMG GT.</item>
		<item>911 Carrera Cabriolet</item>
		<item>Ghibli</item>
	</string-array>
</resources>
- 加入三個string-array的資料,以供後續使用。
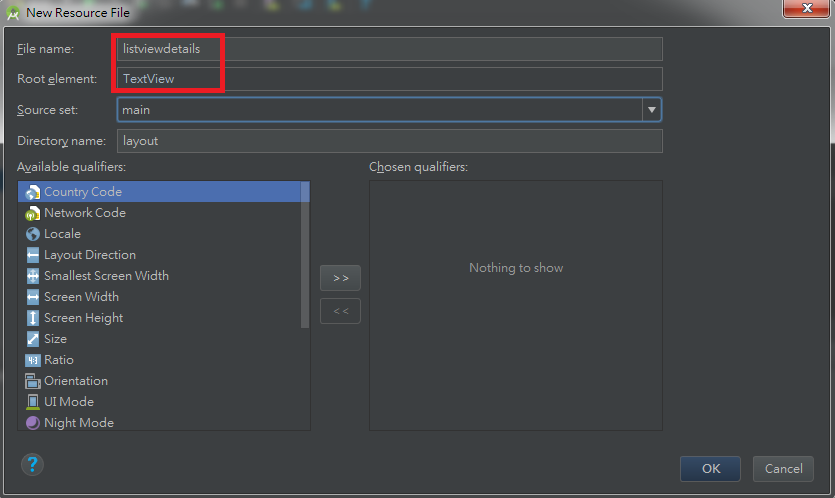
修改紅色方框內的名稱後按OK。多了一個名為listviewdetails.xml的tab,可以在Attributes處修改textSize(e.g. 24sp),讓顯示的文字大一些。回到MainActivity.java,修改程式碼如下:
AppListView > MainActivity.java
package com.mtjade.applistview;

import android.content.res.Resources;
import android.support.v7.app.AppCompatActivity;
import android.os.Bundle;
import android.widget.ArrayAdapter;
import android.widget.ListView;

public class MainActivity extends AppCompatActivity {

	ListView listView;
	String cars[];
	@Override
	protected void onCreate(Bundle savedInstanceState) {
		super.onCreate(savedInstanceState);
		setContentView(R.layout.activity_main);

		Resources res = getResources();
		listView = findViewById(R.id.listView);

		cars = res.getStringArray(R.array.cars);
		listView.setAdapter(new ArrayAdapter<>(this, R.layout.listviewdetails, cars));
	}
}
- 使用getResources()傳回resources,並使用getStringArray()來取得array.cars的內容。
- 使用listView.setAdapter()方法來設定Adapter,參數使用ArrayAdapter物件,舊版的generic使用
,新版直接使用<>(會出現提示)。 - 此時執行程式可觀察結果。
More
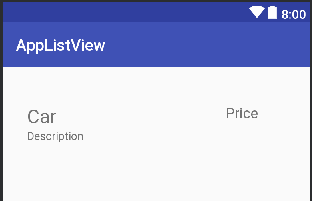
適才的例子僅為測試,只有出現車名。現在將listviewdetails.xml刪除,按右鍵選擇delete...。重新建立listviewdetails.xml,一樣在左方檔案目錄中的Android > app > res > layout上點右鍵,打開New > Layout resource file,File name一樣使用listviewdetails,但是Root element改為RelativeLayout,按OK。在出現的listviewdetails.xml的手機畫面上配置三個TextView如下,其ID分別為car, price, description。
接下來增加一個java Class,在Android > app > java > ...applistview > MainActivity按右鍵(在...applistview or MainActivity皆可)點選New > Java Class,出現視窗如下:
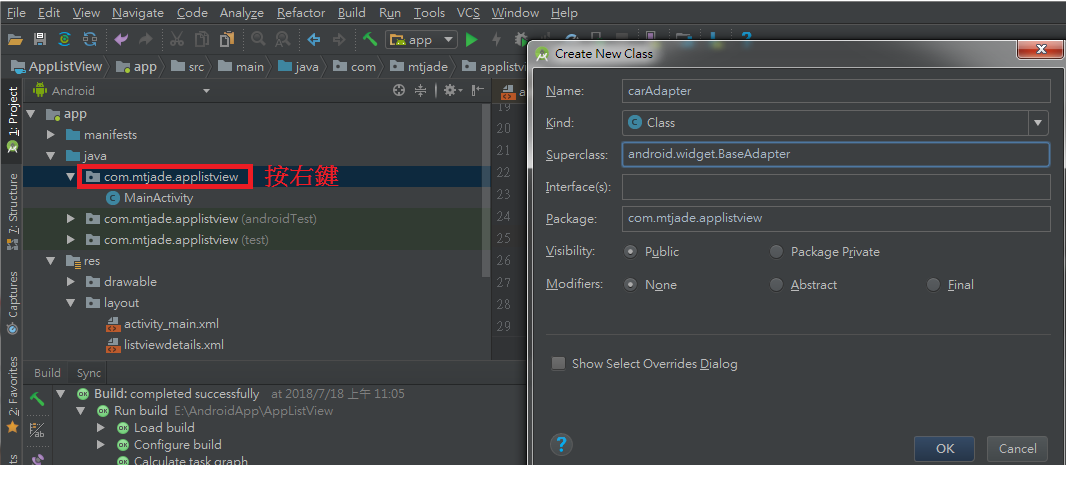
修改Name --> carAdapter,Superclass --> BaseAdapter。>> OK。接下來到carAdapter.java修改程式碼如下。
carAdapter.java
package com.mtjade.applistview;

import android.content.Context;
import android.view.LayoutInflater;
import android.view.View;
import android.view.ViewGroup;
import android.widget.BaseAdapter;
import android.widget.TextView;

public class carAdapter extends BaseAdapter {

	LayoutInflater mInflater;
	String cars[];
	String prices[];
	String descriptions[];

	public carAdapter(Context c, String[] cars, String[] prices, String[] descriptions) {
		this.cars = cars;
		this.prices = prices;
		this.descriptions = descriptions;
		mInflater = (LayoutInflater) c.getSystemService(Context.LAYOUT_INFLATER_SERVICE);
	}

	@Override
	public int getCount() {
		return cars.length;
	}

	@Override
	public Object getItem(int i) {
		return cars[i];
	}

	@Override
	public long getItemId(int i) {
		return i;
	}

	@Override
	public View getView(int i, View view, ViewGroup viewGroup) {
		View v = mInflater.inflate(R.layout.listviewdetails, null);
		TextView tvCar = (TextView) v.findViewById(R.id.car);
		TextView tvPrice = (TextView) v.findViewById(R.id.price);
		TextView tvDescription = (TextView) v.findViewById(R.id.description);

		String car = cars[i];
		String price = "$" + prices[i];
		String description = descriptions[i];

		tvCar.setText(car);
		tvPrice.setText(price);
		tvDescription.setText(description);

		return v;
	}
}
- 一開始可以先點一下public,然後將游標移到public上方,應該會出現一個燈泡圖樣,點一下,會出現如下畫面
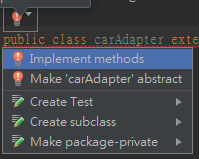
點第一個Implement methods,會出現以下視窗。
點擊OK可以幫我們設定要建立的方法,可減少打字。 - LayoutInflater是abstract class。
- Instantiates a layout XML file into its corresponding View objects. It is never used directly. Instead, use Activity.getLayoutInflater() or Context.getSystemService(Class) to retrieve a standard LayoutInflater instance that is already hooked up to the current context and correctly configured for the device you are running on.。
- 使用getSystemService(String name)方法傳回LayoutInflater物件。
MainActivity.java
package com.mtjade.applistview;

import android.content.res.Resources;
import android.support.v7.app.AppCompatActivity;
import android.os.Bundle;
import android.widget.ArrayAdapter;
import android.widget.ListView;

public class MainActivity extends AppCompatActivity {

	ListView listView;
	String cars[];
	String prices[];
	String descriptions[];
	@Override
	protected void onCreate(Bundle savedInstanceState) {
		super.onCreate(savedInstanceState);
		setContentView(R.layout.activity_main);

		Resources res = getResources();
		listView = findViewById(R.id.listView);

		cars = res.getStringArray(R.array.cars);
		prices = res.getStringArray(R.array.prices);
		descriptions = res.getStringArray(R.array.descriptions);
		//listView.setAdapter(new ArrayAdapter<>(this, R.layout.listviewdetails, cars));

		carAdapter ca = new carAdapter(this, cars, prices, descriptions);
		listView.setAdapter(ca);
	}
}
- 根據剛剛建立的carAdapter建立一個物件,使用listView.setAdapter()方法設定Adapter。
- 執行程式觀察結果。
Add Activities
- 目前點擊ListView並沒有反應,若要點擊後轉換到其他頁面,如前所述,需先設計其他Activity。
- 建立一個新的名為DetailsActivity的Activity。
-
在activity_details.xml中,選擇Palette > common > ImageView,拖曳至手機畫面。此時會跳出一個視窗,需要先選擇一個預設圖案,所以點開Project,選擇第一個ic_launcher,如下圖。
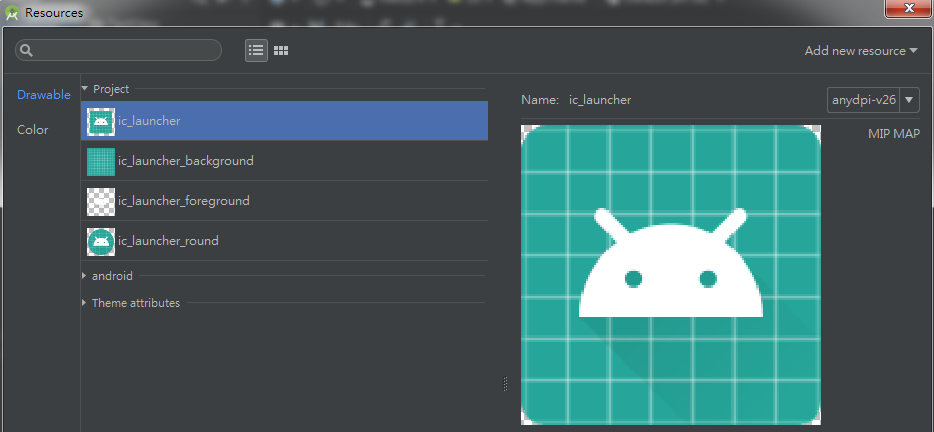
按下OK後,會看到該圖案,調整一下其位置。
MainActivity.java
listView.setOnItemClickListener(new AdapterView.OnItemClickListener() {
	@Override
	public void onItemClick(AdapterView<?> adapterView, View view, int i, long l) {
		Intent showDetailsActivity = new Intent(getApplicationContext(), DetailsActivity.class);
		showDetailsActivity.putExtra("MtJade.com", i);
		startActivity(showDetailsActivity);
	}
});
- 因為是在ListView內,使用setOnItemClickListener()來建立每一個item被典籍後的回應。
- 一樣使用Intent來傳遞資訊。
Add Photos
現在點任一個item看到的圖都是同一個,要改變圖案,首先先準備三張圖片,將此三張圖片放置於Android > app > res > drawablea內。接著到DetailsActivity.java修改程式碼。
DetailsActivity.java
package com.mtjade.applistview;

import android.content.Intent;
import android.graphics.Bitmap;
import android.graphics.BitmapFactory;
import android.support.v7.app.AppCompatActivity;
import android.os.Bundle;
import android.view.Display;
import android.widget.ImageView;

public class DetailsActivity extends AppCompatActivity {

	@Override
	protected void onCreate(Bundle savedInstanceState) {
		super.onCreate(savedInstanceState);
		setContentView(R.layout.activity_details);

		Intent in = getIntent();
		int index = in.getIntExtra("MtJade.com", -1);

		if(index > -1){
			int pic = getImg(index);
			ImageView img = (ImageView) findViewById(R.id.imageView);
			scaleImg(img, pic);
		}
	}

	private int getImg(int index){
		switch(index){
			case 0: return R.drawable.benz;
			case 1: return R.drawable.maserati;
			case 2: return R.drawable.porsche;
			default: return -1;
		}
	}
	private void scaleImg(ImageView img, int pic){
		Display screen = getWindowManager().getDefaultDisplay();
		BitmapFactory .Options options = new BitmapFactory.Options();

		options.inJustDecodeBounds = true;
		BitmapFactory.decodeResource(getResources(), pic, options);

		int imgWidth = options.outWidth;
		int screenWidth = screen.getWidth();
		if(imgWidth > screenWidth){
			int ratio = Math.round((float)imgWidth/(float)screenWidth);
			options.inSampleSize = ratio;
		}
		options.inJustDecodeBounds = false;
		Bitmap scaledImg = BitmapFactory.decodeResource(getResources(), pic, options);
		img.setImageBitmap(scaledImg);
	}
}
- 設計getImg()方法來取得圖片,圖片位於R.drawable之下。
- 設計scaleImg()方法來縮放圖片,因為顯示的螢幕不大,無法承擔太大的圖檔。
- 執行程式觀察結果。
Data Persistence
之前介紹過的Intent可以轉換到另一頁並傳遞資料(Bundle),另外還有其他方式可以儲存資料並傳輸。例如:- SharedPreferences。
- Internal or external storage。
- Database。
SharedPreferences
大概是最簡單的方式,使用SharedPreferences物件。開啟新的專案,在其上設計兩個Plain text(用以輸入first name與last name),然後在之下設計兩個按鈕,第一個顯示Save,另一個顯示Load,此外,在其下加上一個TextView用以顯示文字。如下: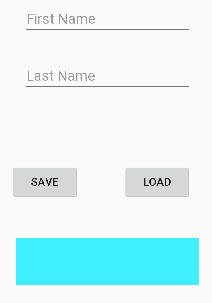 Java code如下:
Test > Main3Activity.java
package com.mtjade.test;

import android.content.Context;
import android.content.SharedPreferences;
import android.support.v7.app.AppCompatActivity;
import android.os.Bundle;
import android.view.View;
import android.widget.Button;
import android.widget.EditText;
import android.widget.TextView;
import android.widget.Toast;

public class Main3Activity extends AppCompatActivity {

	@Override
	protected void onCreate(Bundle savedInstanceState) {
		super.onCreate(savedInstanceState);
		setContentView(R.layout.activity_main3);

		Button btSave = (Button) findViewById(R.id.btSave);
		Button btLoad = (Button) findViewById(R.id.btLoad);
		final EditText txtFirstName = (EditText) findViewById(R.id.txtFirstName);
		final EditText txtLastName = (EditText) findViewById(R.id.txtLastName);
		final TextView tvDisplay = (TextView) findViewById(R.id.tvDisplay);

		btSave.setOnClickListener(new View.OnClickListener() {
			@Override
			public void onClick(View view) {
				SharedPreferences sp = getPreferences(Context.MODE_PRIVATE);
				SharedPreferences.Editor edit = sp.edit();
				String fname = txtFirstName.getText().toString();
				String lname = txtLastName.getText().toString();
				edit.putString("lname", lname);
				edit.putString("fname", fname);
				edit.apply();
				Toast.makeText(Main3Activity.this, "Saved", Toast.LENGTH_SHORT).show();
			}
		});

		btLoad.setOnClickListener(new View.OnClickListener() {
			@Override
			public void onClick(View view) {
				SharedPreferences sp = getPreferences(Context.MODE_PRIVATE);
				String fname = sp.getString("fname", "na");
				String lname = sp.getString("lname", "na");
				tvDisplay.setText(String.format("%s, %s", fname, lname));
			}
		});
	}
}
- 跟之前一樣,取得所有物件並命名(btSave, btLoad, txtFirstName, txtLastName, tvDisplay)。
- btSave的onClick事件中,宣告SharedPreferences名稱為sp,並用getPreferences()方法回傳(Context.MODE_PRIVATE表示僅可被應用程式使用,傳入內容會覆蓋原內容)。
- 使用sp.edit()方法產生SharedPreferences.Editor,用來編輯儲存檔案。
- 使用putString方法來儲存資料,第一個參數為資料名稱(key),第二個為數值(value)。
- 使用apply()或commit()來儲存資料,apply()是asynchronously,commit()是synchronous並傳回一個boolean值。
- Toast.makeText(...).show()可用來短暫顯示訊息(類似pop-up window)。
- 在Load按鈕的onclick事件內,再度使用getPreferences(Context.MODE_PRIVATE)來建立SharedPreferences物件。
- 接下來使用sp.getString(...)來取得資料,第二個參數為沒得到數值的預設值。
- 使用setText()方法在TextView內顯示資料。
getSharedPreferences
上述的例子僅能在同一個Activity內操作,若是要在另一個Activity使用資料,則方式如下。首先設計另一個Activity,其中包含一個按鈕與一個TextView,按鈕用來觸發取得資料,TextView用來顯示資料(當然也可以利用Toast等其他方式顯示資料)。接下來將上例中的Save內的onClick事件中的SharedPreferences sp = getPreferences(Context.MODE_PRIVATE);這一行comment掉,修改如下:
Test > Main3Activity.java
String file = "myFile1";
SharedPreferences sp = getSharedPreferences(file, Context.MODE_PRIVATE);
- getSharedPreferences(file, Context.MODE_PRIVATE)方法,請注意多了第一個參數為檔案名。
Button btShow = (Button) findViewById(R.id.btShow);
final TextView tvPreferences = (TextView) findViewById(R.id.tvPreferences);
btShow.setOnClickListener(new View.OnClickListener() {
	@Override
	public void onClick(View view) {
		SharedPreferences sp = getSharedPreferences("myFile1", Context.MODE_PRIVATE);
		String fname = sp.getString("fname", "na");
		String lname = sp.getString("lname", "na");
		tvPreferences.setText(fname + " " + lname);
	}
});
- 此處依然是使用getSharedPreferences("myFile1", Context.MODE_PRIVATE);來產生SharedPreferences物件。
- 因為是使用getSharedPreferences,所以在此可以直接取得myFile1檔案內的fname, lname等資料,將這些資料顯示在TextView(tvPreferences)內。
- 使用SharedPreferences物件只能夠儲存傳遞primitive types and string types,複雜的檔案型態(e.g. 圖片,聲音,影片等)無法儲存傳遞。
- getSharedPreferences的效果應該也可以使用getPreferences()+Intent(Bundle)來傳遞資訊。。
Internal Storage
直接將資料檔案儲存在手機內存內,使用openFileOutput(filename, Context.MODE_APPEND)來開啟輸入資料流(write),或使用openFileInput(filename)來開啟讀取資料流(read),範例的元件配置為設置一個editText(可以輸入多行資訊),兩個按鈕(一顯示Save,一顯示Load),最後再設置一個TextView用以顯示資料。Test > Main4Activity.java
package com.mtjade.test;

import android.content.Context;
import android.support.v7.app.AppCompatActivity;
import android.os.Bundle;
import android.view.View;
import android.widget.Button;
import android.widget.EditText;
import android.widget.TextView;
import android.widget.Toast;

import org.w3c.dom.Text;

import java.io.FileInputStream;
import java.io.FileNotFoundException;
import java.io.FileOutputStream;
import java.io.IOException;

public class Main4Activity extends AppCompatActivity {

	EditText editText;
	private String filename = "myfile.txt";
	@Override
	protected void onCreate(Bundle savedInstanceState) {
		super.onCreate(savedInstanceState);
		setContentView(R.layout.activity_main4);

		editText = (EditText) findViewById(R.id.etInput);
		Button btSave = (Button) findViewById(R.id.btSave);
		btSave.setOnClickListener(new View.OnClickListener() {
			@Override
			public void onClick(View view) {
				saveData(view);
				Toast.makeText(Main4Activity.this, "Saved", Toast.LENGTH_SHORT).show();
			}
		});
		Button btLoad = (Button) findViewById(R.id.btLoad);
		btLoad.setOnClickListener(new View.OnClickListener() {
			@Override
			public void onClick(View view) {
				loadData(view);
			}
		});
	}

	public void saveData(View v){
		String str = editText.getText().toString();
		FileOutputStream out = null;
		try {
			out = openFileOutput(filename, Context.MODE_APPEND); // may throw a “FileNotFoundException”;
			out.write(str.getBytes()); // It can only work with bytes, may throw an “IOException”;
		} catch (FileNotFoundException e) {
			e.printStackTrace();
		} catch(IOException e){
			e.printStackTrace();
		} finally{
			if (out!=null){
				try{
					out.close(); // may throw an “IOException”
				}catch(IOException e){
					e.printStackTrace();
				}
			}
		}
	}

	public void loadData(View v) {
		TextView tvShow = (TextView) findViewById(R.id.tvShow);
		FileInputStream in = null;
		StringBuilder sb = new StringBuilder();

		try {
			in = openFileInput(filename); // may throw a “FileNotFoundException”;
			int read = 0;
			while((read = in.read())!=-1) { // when it reaches the end of the file, it will return -1
				sb.append((char) read);// in.read( ) method returns an int;
			}
			tvShow.setText(sb.toString());
		} catch (FileNotFoundException e) {
			e.printStackTrace();
		}catch (IOException e) {
			e.printStackTrace();
		} finally {
			if(in!=null){
				try {
					in.close();
				} catch (IOException e) {
					e.printStackTrace();
				}
			}
		}
	}
}
- 設計saveData()與loadData()兩個方法來分別回應兩個Button的onClick事件。
- 使用out = openFileOutput(filename, Context.MODE_APPEND);程式碼來建立資料流,此方式可能會傳回FileNotFoundException。若是不想append,可以使用Context.MODE_PRIVATE來重新建立檔案內容,。
- 使用out.write(str.getBytes());來將資料寫入檔案,此方式僅能使用Bytes且可能傳回IOException。
- 使用out.close();方法來結束資料流。
- 讀取方式亦相同,使用in = openFileInput(filename);建立資料流。
- 使用in.read()讀取資料,若傳回-1表示到了文件最後。
- StringBuilder.append來將資料加入檔案,讀取資料須先cast為char。
Room
使用Room來溝通資料庫。首先將以下程式碼加入到build.gradle的dependencies內。def room_version = "1.1.1"
implementation "android.arch.persistence.room:runtime:$room_version"
annotationProcessor "android.arch.persistence.room:compiler:$room_version" // use kapt for Kotlin
// optional - RxJava support for Room
implementation "android.arch.persistence.room:rxjava2:$room_version"
// optional - Guava support for Room, including Optional and ListenableFuture
implementation "android.arch.persistence.room:guava:$room_version"
// Test helpers
testImplementation "android.arch.persistence.room:testing:$room_version"
- 上述內容為本文撰寫時目前版本,若版本過舊,可在此找到最新的版本。
Gestures
除了使用按鈕等元件來觸發,也可以使用手勢來操控手機。使用的類別為GestureDetectorCompat,以下示範如何左右滑動來轉換Activity(換頁)。- 首先先宣告private GestureDetectorCompat mDetector;。
- 接著在onCreate內new GestureDetectorCompat物件,mDetector = new GestureDetectorCompat(this, new MyGestureListener());。
- 第二個參數可以直接使用匿名物件,也就是直接寫入new OnGestureListener() {methods...},此處將物件定義分開,寫成MyGestureListener()。
- OnGestureListener()包含多個手勢方法,例如onSingleTapUp()、onShowPress()、onScroll()、onLongPress()、onFling()、onDown()。在此使用onFling()。
- 在onCreate之外(同級方法)設計以下兩個方法。。
Test > Main4Activity.java
@Override
public boolean onTouchEvent(MotionEvent event){
	this.mDetector.onTouchEvent(event);
	return super.onTouchEvent(event);
}
class MyGestureListener extends GestureDetector.SimpleOnGestureListener{

	public boolean onFling(MotionEvent e1, MotionEvent e2, float velocityX, float velocityY){
		if(e2.getX() - e1.getX() > FLIP_DISTANCE){
			Intent intent = new Intent(Main4Activity.this, Main3Activity.class);
			startActivity(intent);
			return true;
		}
		return false;
	}
}
- 需要Override onTouchEvent()這個方法來使得設計可行。
- MyGestureListener繼承自GestureDetector.SimpleOnGestureListener。
- onFling()有四個參數,在此僅在意手勢是往左滑或是往右滑,所以僅使用前兩個。
- e1是一開始的位置,e2為最後位置,x軸座標左小右大,若是往右滑表示e2.getX()大於e1.getX(),兩者差距大於FLIP_DISTANCE時,觸發事件。
- FLIP_DISTANCE為自定義常數,此處設為protected static final float FLIP_DISTANCE = 50;。
- 觸發時使用startActivity(intent);方法換頁。
- 類似的手勢方法可以設計在MyGestureListener物件內。
